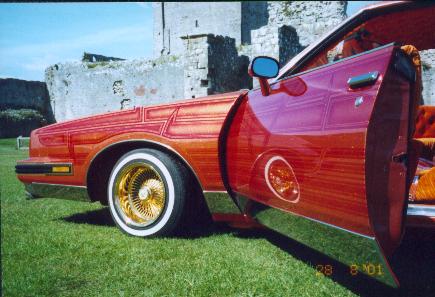
Part 4; Metalflake - Mixing & Application...

Part 4; Metalflake - Mixing & Application...
FLAKE AMOUNT PER 1.25 LITRES OF MIXED LACQUER
1/64th Flake:- Dark base = 1-3oz; Light base = 3oz
1/128th, 1/256th, 1/500th Flake:- Dark base = 2 level tsp-1oz; Light base =
1oz
Thin your lacquer with 150% thinners or 1 part lacquer to 1 1/2 parts
thinners, using slow dry thinners (HOUSE OF KOLOR 101 thinners).
Next add your flake as per the above measurements, and stir well.
FULL FLAKE COVERAGE USING 1/64th FLAKE
Now that you have prepared your car, flattened it down with 500 or 600 wet
and dry, rinsed and dried it off. You must now tack it off with a 'Low Tack'
tack rag.
Make sure that your workshop is warm, as a cold workshop will slow down the
flash off time too much and may result in your flake gathering in lows and at
bodylines, and result in runs. Try to get the workshop up to at least 65F.
Now set the air pressure at the gun to 35psi.
Apply the first coat quite light with the gun at 10-12 inches from the panels in
a 50% overlap pattern. This helps the lacquer to key to the primer ready for
laying on full coats.
Once this has flashed off, (last part that was sprayed should be dry to touch),
you can now carry on laying on a further 6 coats. These build up coats should be
applied with the gun 6-8 inches from the panels, and in a 75% overlap pattern.
Always remember to allow coats to flash before applying the next coat.
Then when you have applied all of your flake coats, leave to rest for 1/2-1
hour.
You now need to start to bury your flake with the first stage of clear lacquer.
The reason for this is to protect the flake from dust biting in, as you will not
be able to tack it off as it will be rough. Another reason to seal it with
lacquer straight away is you will not be able to flatten down the flake to key
for lacquer, as that would ruin the flake and rub the kolors from it.
Mix the lacquer to the same 150% mixture with thinners as before.
If your workshop is a touch on the cool side, you could now use a faster
thinners (HOUSE OF KOLOR 202 thinners).
Now turn the air pressure at the gun up to 45psi.
With the gun again 6-8 inches from the panels, start applying 7 coats of
lacquer in a 50% overlap pattern. Remembering to allow each coat to flash
before applying the next.
Once you have applied the first stage lacquer coats, leave to harden for at
least 2 days. Even after 2 days, the paint will not be totally hardened
through, but it will be ready to work on.
Soak some 500 or 600 wet and dry (3M) in water for at least 20 minutes, then
using a little washing-up liquid, start to flatten down the lacquer. This stage
for most people will be the most worrying, as you can run the risk of hitting
your flake and ruining your work.
It only needs to be a light flatten with your hand, DO NOT USE A BLOCK! All you
are trying to do on this first flatten is to knock off the highs in the orange
peel effect you can see in the lacquer. So about 25% of the way to total flat.
Once flattened, thoroughly rinse any soapy residue from your panels, dry, then
lightly tack.
IF YOU INTEND TO ADD A KANDY OR PATTERNS OVER THE FLAKE, THIS WOULD BE THE
NEXT STAGE. I WILL COVER THESE IN PARTS 5 AND 6.
Now using the same lacquer/thinners mixture as before, and same psi etc,
apply another 5 coats. Again....allow coats to flash off.
Now leave again for another 2 days.
Using the same grade wet and dry, this time flatten down as much as you can
using a small block. You also need to cut it back further this time, try to
flatten about half the orange peel effect away.
Rinse, dry, tack and apply another 5 coats of lacquer. Leave again for 2 days.
When you flatten this time, get it so that it is practically flat. Maybe just
showing little dimples in the flattening down.
Again rinse, dry, tack and apply a final 5 coats of lacquer.
It will take 2-3 months for your paintwork to be dry enough to be sanded and
polished. Exposing the paint to sunshine as much as possible is by far the best
way to speed up the hardening process. When you can press on your paint with a
finger nail, and it doesn't mark. then it is ready.
Using 1500 wet and dry (DO NOT buy cheap paper, it wont last), flatten the
lacquer with a block until there are absolutely NO shiny spots.
Now polish using G6 then G3 rubbing compond. Finish off with a lambs wool head
on a mop using G10.
Now you can Stand back and be Proud

Part 5 Kandy
Tech Section
| 

