Electrics Intro
By Geoff Kremer

This series of articles will deal with the basic electrical systems, how to
improve and modify them.
I will not be delving into complicated theories and systems this will be more of
a hints and tips feature. I will give you a little outline of how things work
first.
The words!
AMPS is the unit of current and is the quantity of energy flowing . As an
analogy itís a bit like engine Torque.
VOLTS is the pressure of the energy a bit like RPM.
WATTS is the amount of actual power that is equated from the above and is equal
to Horse Power.
OHMS is the unit of resistance an item presents to the power flowing through it
and is the same as Friction.
A SHORT CIRCUIT is when all the available energy, unintentionally bypasses the
load.
An OPEN CIRCUIT is when, unintentionally, all the power stops going where you
want it.
EARTH or GROUND or DECK
is the return for all the electrical energy returning
from the load.
LIVE or HOT is the power coming from the source e.g. battery, to the load via
whatever bits and bobs, switches etc, you have along the way.
RULE NUMBER ONE
ALL CURRENT FLOWS IN AN UNBROKEN CIRCUIT!
The bits and pieces!
The LOAD is the item you want the electrical energy to power e.g. motors, lamps
etc.
A CONDUCTOR is anything that will allow the passage of electrical current.
Generally itís metal.
An INSULATOR Is anything that prevents a current to flow. Generally itís
anything that isn't metal.
(There are many exceptions to the above rules but for our needs it will hold
true.)
A SWITCH is a device that will intentionally control the flow of current.
A RELAY is a modified switch that is controlled by another switch that canít
directly handle the demands of the load.
A FUSE is the thing that stops everything catching alight if you have a
SHORT CIRCUIT.
(A SPARK PLUG is just the reverse of a fuse, it catches light when the energy
reaches a critical point!).
If you can hang on to the above information you wonít go far wrong.
SOME SERIOUS DOíS AND DONíTS
- DO NOT Run cables through
holes without proper grommets.
- DO NOT Use household
wiring.
- DO NOT Wrap wires around
terminals and screws.
- DO NOT Twist conductors
together and then leave them.
- DO Use the proper
materials to wrap a harness.
- DO Solder terminals onto
the conductor.
- DO Use
fuses to protect individual circuits .
- DO use the correct size of
cable for the job.
TOOLS
Depending an what you are going to do here is a list of some ďmust haveĒ
tools.
- Pair decent side cutters.
- Soldering iron, about a 25 Watt iron should do with a decent size
tip and make sure itís an English or American one they are the best. Makes
are: ANTEX, WELLER, ADCOLA. I would steer away from soldering guns since
they are very heavy to use and you just donít have the control. With the
iron get a reel of 18 swg /1.2mm 60/40 flux cored solder.
- Automatic wire strippers are absolutely invaluable these one
handed wire strippers will make things nice and easy. Get the all metal ones
if you can.
- Test lamp, almost anything from a bulb and two wires to a proper
auto electrical one will do.
- Terminal crimpers. If you can get it, the Ripaults basic one is
best otherwise get one that will suit the terminals you are going to
use........more on terminals later.
BASIC MATERIALS
Terminals.
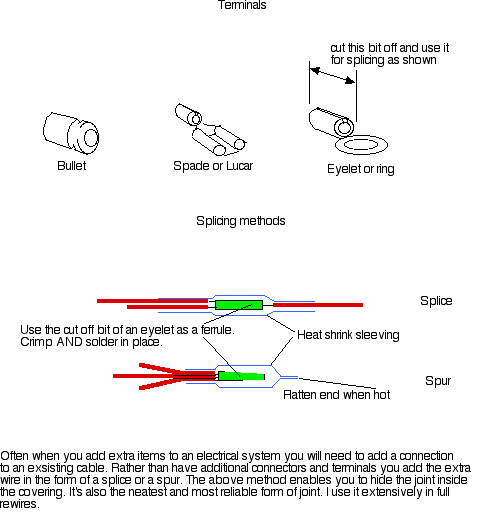
There are three basic style of terminal used in auto electrics.
Spade.........Bullet.........Eyelet or Ring.
Now Iím very biased when it comes to terminals. I donít like those coloured
plastic ones I think they look awful but they are easy to use and easily
available. If you can get the Lucas or Ripaults terminals and covers they will
give you a more professional finish also they are more reliable and donít
overheat. But what ever, do get the right ones.
Bullets come generally in one O.D. size but do come in various I.D. sizes to fit
the cables used.
Spade or Lucar terminals come in a variety of blade and cable sizes from 2.8mm
to 9.5mm blades the two most commonly used are 6.3mm and for the big stuff
9.5mm.
Eyelet or ring come in all sorts of sizes to fit a variety of cables and screws
Cables.
As I said before use only cables designed for automotive use. Do not use
household wiring...you will regret it.
The job of the cable is to convey electrical energy and the big problem here is
resistance over current. All metal has a resistance (ok! what clever clogs is
going to point out super conductors?)
and the object of the lesson is to minimise the resistance, So use the right
size cable for the job here is a brief list of what can do what. Iíve included
the old style sizes as well.
- 9/030 0.65mm : gauges, side lights, interior lights.
- 14/030 1 mm : brake and reversing lights, wipers, indicators,
light duty sub feeds.
- 28/030 2 mm : head lights, ignition, horns, radiator fans,
medium duty sub feeds .
- 84/030 6 mm : alternator main feed, main power feed to
electrical system.
These cable sizes are just about the only ones you are going to need so I
suggest you get a reel of each plus one reel of black 1mm. You wont need the 6mm
unless you are going to do a complete rewire. As for colours well it would be
wise use a different colour for each job and indeed the Lucas colour code is
just about the best there is but are you really going to order 30+ reels of
cable just to get a few feet of each colour. Basically so long as you know what
wire does what then youíll be ok but here is the very basic body colour
Lucas scheme
- Brown main electrical input feed and charging circuit.
- Blue head lights
- Green fused ignition circuits, indicators, brake lights,
reveres lights.
- white unfused ignition circuits
- Red side lights, dash lights.
- Mauve horns, interior lights.
- Black earth THIS IS IMPORTANT: KEEP ONLY AND ALL EARTHS BLACK
THEN ANY OTHER COLOUR YOU TREAT AS POTENTIALLY LIVE.
Other things
Tie wraps or cable ties are must to have.
Adhesive electrical insulating tape.
Harness tape. Now this stuff is the only tape you should use to wrap a
harness in. Basically its the electrical insulating tape but without the
adhesive and is the tape most manufacturers use. Do not use the adhesive tape
otherwise after a while itíll start to undo, and it leaves a sticky residue
behind which you cannot get off so please be warned!
Heat shrink sleeving. It is absolutely invaluable and comes in all sizes. This
is the stuff that shrinks to up to a third of itís original size when heated.
You can use a small hot air gun or a gas cigarette lighter to shrink the
sleeving.

Tech Section
| 
