Mig Welding
By Geoff Kremer
Here I am going to try and introduce you to MIG welding, the corner stone of Rod
building these days.
Basic requirements
A MIG welder, get nothing less than 150 Amps preferably fan cooled, dont get
a portable one you will regret it and make sure it comes with a proper gas
regulator so you can put a decent size bottle on. What ever you do Do
not get a gas less unit. Also ask if you can have a BINZEL torch
fitted, if it hasn't already got one. I have found these German torches are the
nicest to use.
Use only the proper gas, ARGOSHEILD is very common and is a CO2, Argon mix.
Do not use pure CO2. If you
plan to do a lot of welding get a full size gas bottle from BOC.
Make sure you have spare torch tips and cones, the wire and tip size I recommend
is 0.8 mm, that will do for anything thing up to 1/4 inch thick metal.
You absolutely must use a proper welding visor, get a hat type not hand held,
also get a few spare front clear glass replacements.
Use
it at all times when welding otherwise youll get arc eye, dont ask
what it is you wouldn't want to know unless you like having you eyes stabbed
with hot needles.
Get some decent gauntlets Golden or Silver Leather are the best and
your overalls should be cotton not synthetic and always keep your arms covered
unless you like UV burns.
A spray can of spatter release will ensure you have a nice clean
finish.
How to fly your MIG!
There are five basic controls on a MIG welder.
1 Wire feed speed
2 Current or Amperage setting.
(You may have other things like a stitch setting, for timed bursts of welding,
leave this off.)
3 And on top of the bottle, the gas flow regulator.
4 Wire feed pressure
5 A wire drum clutch adjustment.
6 Wire feed roller
On the front panel you will have:
1 The wire feed speed which controls the speed of the wire, that obvious I
suppose. Set too high and the wire will try to push itself through the weld
without properly fusing. Set too low and the wire will drip onto the weld and
also burn back into the tip.
2 The current setting depends on the thickness and type of weld you're doing.
Too high a setting will blow holes in the metal, too low and you wont get a
proper weld.
3 Gas flow regulator. This should be set to give a flow of gas around the weld.
Too high and you're wasting gas, too low and the weld will be no good at all. As
a rule of thumb you should be able to hear a gentile flow of gas from the torch
when you pull the trigger. You would increase the setting if youre welding in
a draught or outside.
On the inside of you're MIG you should find:
4 The wire feed pressure, this ensures the wire is gripped by its roller and
pushed through properly. Too high a pressure will wear out the roller and
bearings, too low and the wire will slip.
5 You will also find the drum tension. This stops the drum from spinning and the
wire unraveling. This should be set so that the wire has just a little tension
on it. Too much tension and the wire roller wont be able to pull the drum
around, too little and the wire will spill off the drum when you release the
torch trigger.
6 Also there is the wire feed roller or bobbin. This is the thing that drives
the wire along and on most MIGs has two grooves. The smaller one for .8mm and
the larger 1mm. Make sure you have this the right way round for the wire you are
using. The groove you want should be inline with the inner sheath as mentioned
below.
Things that may happen.
If when you are welding the wire stops: there could be three reasons.
1 Youve run out of wire, or you're missus has turned the power off!
2 The wire has burnt back into the tip. You should be able to grip the remaining
bead on the tip with a pair of pliers and pull it away. If it has burnt right
back you will have to unscrew the tip and cut the wire, you may be able to
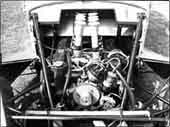
unblock the tip otherwise fit a new one. see fig 1 for a picture of the torch.
3 The wire has birds nested. There is a gap between the feed roller and
the sheath that runs down the center of the cable going to the torch. Often when
you get a burn back, the wire will collect in a mess in that gap. You will have
to cut the wire off near the drum, pull out the old wire then re thread it
again.
After many hours of welding, the shroud will start to get spatter on the inside
so pull it off and clean it. Also check the tip, if the hole is worn or the end
is beginning to deform replace the tip. Eventually the shroud will need
replacing as well.
If youve not used a MIG before.
If you are used to gas or arc welding forget everything about those methods,
this is different.
Get yourself loads of off cuts clean mild steel bits about 2mm thick (or
10gauge in proper money) to practice on and start by laying a line of weld on a
flat piece. What you are aiming for is the result in Fig 2. The wire feed speed
and Amperage are closely related and once youve balanced the two you will
rarely need to change them unless you dramatically alter the circumstances of
weld material. Mostly its trial and error. Time, patience and practice are
the key words. Make sure the earth clamp is on nice clean steel.
Before you start to weld make sure you are in comfortable position. Put the
Gauntlets on and use one hand to hold the torch and pull the trigger, and the
other to guide the nozzle.
Start by laying a bead of weld down on one piece of steel. Play around with the
amperage, wire speed and torch movement until you get a nice clean, domed bead
on top and a line underneath. See Fig 2.
You move toward the unwelded part for a number of reasons;
1 In this direction, the metal will be preheated.
2 You will be welding into fresh steel not the weld youve just made.
3 You can see better.
4 The gas will flow where its wanted.
Now we will join two bits of metal together. Clamp two bits so there is a small
1 too 2mm gap between and put a couple of tacks in, then begin finish welding
the joint. At first you may blow holes and miss the gap and have great blobs of
molten steel flying around but persevere.
Youll soon get to know a good weld when you see it!
DO NOT AT ANY TIME.
Cool a weld down by quenching it in water, let it cool
naturally.
Try and weld without the proper CO 2 Argon mix.
Weld without a proper visor
When you blow a hole, (not if!) stop immediately and let the area cool down
then fill the hole. If its rather large, itll happen!, build up a little
ring of weld around the hole, let it cool down then gradually fill it in,
letting weld cool down every few seconds. There is a tip later about filling
holes and gaps.
Distortion.....Every time you heat up a bit of metal it will try to distort due
to expansion, the trick is to either minimise the distortion by limiting
localised heating, or allow for the expansion. In the simple butt joint
you allow a gap between the two (fig 2) and the weld will fill in as you go
along, the gap should never be more than the thickness of the steel.
To minimise localised heating over a large area, weld in short bursts say two
inches or so then move to another part much further away. Eventually although
the whole thing will be hot but there will few or no localised hot spots. This
is particularly important when boxing a chassis. To enable you to do this you
need to tack the new metal into place.
Always tack any new piece into place first.
If you are welding large lengths of steel, like making or boxing a chassis,
first of all clamp the work into place then tack weld it every three to six
inches or so. If its wrong you can easily break the tack welds and do it
again. A tack weld should only be a one or two second burst. (Fig 3)
Once you are happy start finish welding it, spray some spatter release as you go
along then you wont be troubled with beads and blobs sticking to the surface.
As you finish weld the chassis, you may find that despite all your efforts
to prevent it, parts may start to distort and buckle, stop immediately, let it
cool down and if necessary dress (you never hit a bit of metal, you dress
it!) it back into place then add more tack welds along the joint, finish weld it
by doing much smaller welds and letting them cool down between bursts. To make
things easier, if you clamp a nice heavy piece of steel near the weld it will
minimise distortion and act as a heat soak,use three or four clamps. Make sure
you dont weld it to the chassis though.
For Veeing out welds, personally I prefer to use a hand angle grinder with
a 60 or 80 grit sanding disk, grinding the edges before offering it up. I find
it is much more controllable than a solid grinding disc, these tend to dig in
too easily.
DOS
Always Vee out a joint.
Keep moving around.
Tack weld first. Other wise youll cry later!
Try to use both hands.
Get into a comfortable position.
Wear goggles when grinding.
Keep your arms covered.
Make sure the earth clamp is on clean metal.
Tips
When you are welding near a hole, put a nut and bolt in it or at least just
the bolt.
Loads of wet rags around a weld area will limit the spread of heat. Make sure
you dont catch the rags alight.
When welding underneath, horrid job!, you may have to increase the wire feed and
have plenty of wet towels around in case you catch alight.


Tech Section
|